I can't find much on tidal planning on the internet so I thought I would share the way I've been taught.
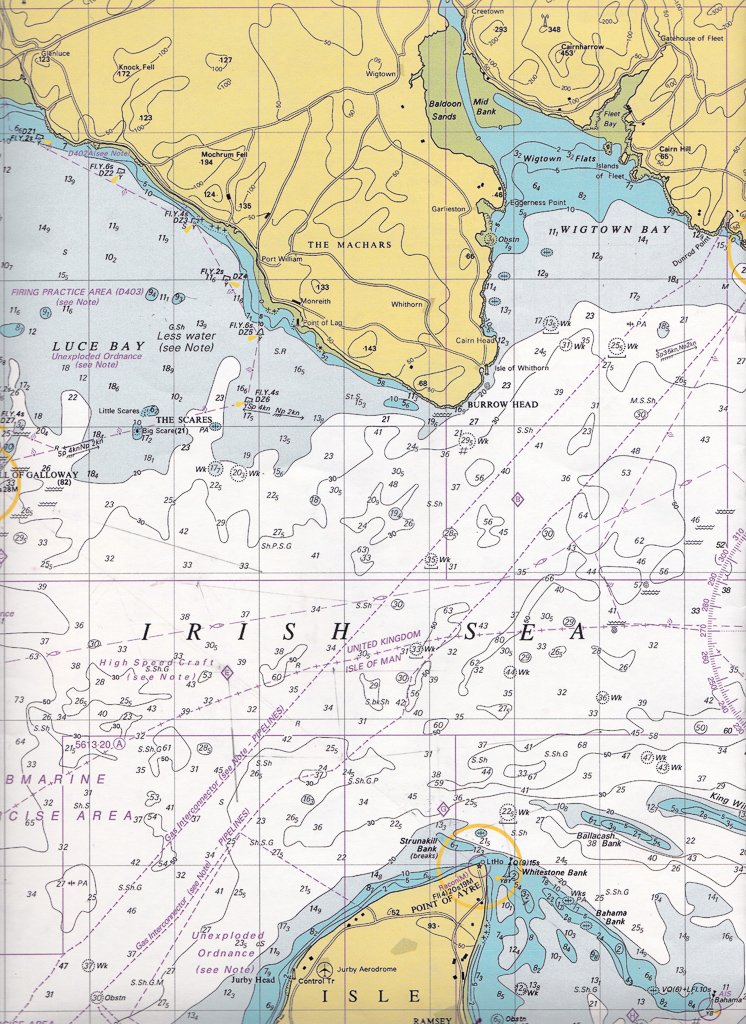
So, as a little exercise, lets say I am planning on paddling from the Point of Ayre on the Isle of Man to the Isle of Whithorn, Scotland on the 28th February 2018.
There are various sources of tidal information you can use: Tidal Atlas, Guide books, Tidal Diamonds on Charts etc.
For this exercise I am going to use the Admiralty Tidal Atlas for the Irish Sea and Bristol channel. The Admiralty Tidal Atlas provides you with a good overview of the tidal streams in the area and you can also read off precise information about the tidal stream direction and its speed at specific points. As each page of the Admiralty Tidal Atlas provides the tidal stream values at hourly intervals, before, during and after high water Dover, you will need to know the tide times for Dover. Each arrow on the chart can have its direction measured, using a plotter, such as Howard Jeffs SKANA, to establish the direction of the tidal stream at that point in time.
From my Reeds Small Craft Almanac 2018 (big hint: makes a good Christmas present) I can look up the tides for Dover on the 28th February 2018, the tides, the mean ranges for the springs and mean neaps (Note: Mean ranges for Dover are also available from the tidal atlas).
| Time | Height (m) | |
|---|---|---|
| 0434 | 1.2 | |
| 0952 | 6.4 | |
| 1719 | 1.1 | |
| 2215 | 6.5 |
Mean Springs for Dover are 6.0m. Mean Neaps for Dover are 3.2m.
Getting a rough idea of the distance involved in the crossing
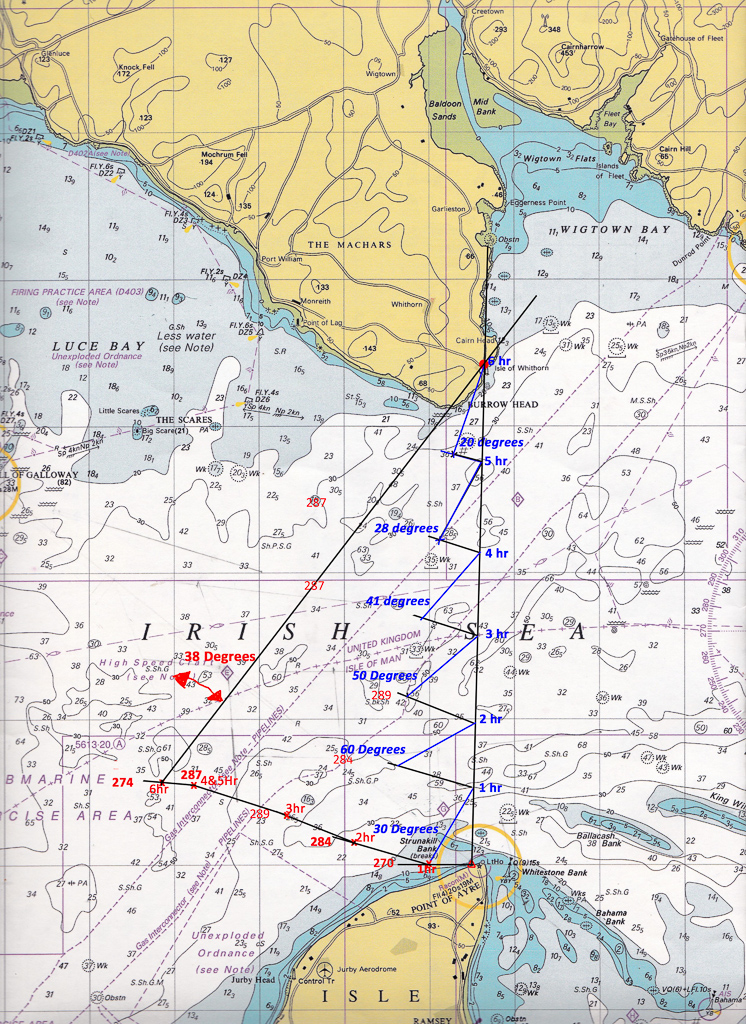
Looking at the chart above you can see using the lines of latitude and longitude, there are three big rectangles between Point of Ayre and Burrow head. Each of these (longest side) is 5Nm in length, and as Isle of Whithorn is virtually north to the Point of Ayre, you can easily estimate the crossing will be around 17.5 Nm in distance. Alternatively, open up your dividers and measure the distance between the Point of Ayre and Isle of Whithorn. Then using the lines of latitude on the side of the chart obtain the exact measurement in nautical miles. Travelling at an average of 3Nm/hour or 3 knots this crossing will take without any tidal movement, in the region of six hours to complete. But knowing you are working on a six hour crossing helps to decide when to leave and to take into account ay constraints, such as how much daylight you will have.
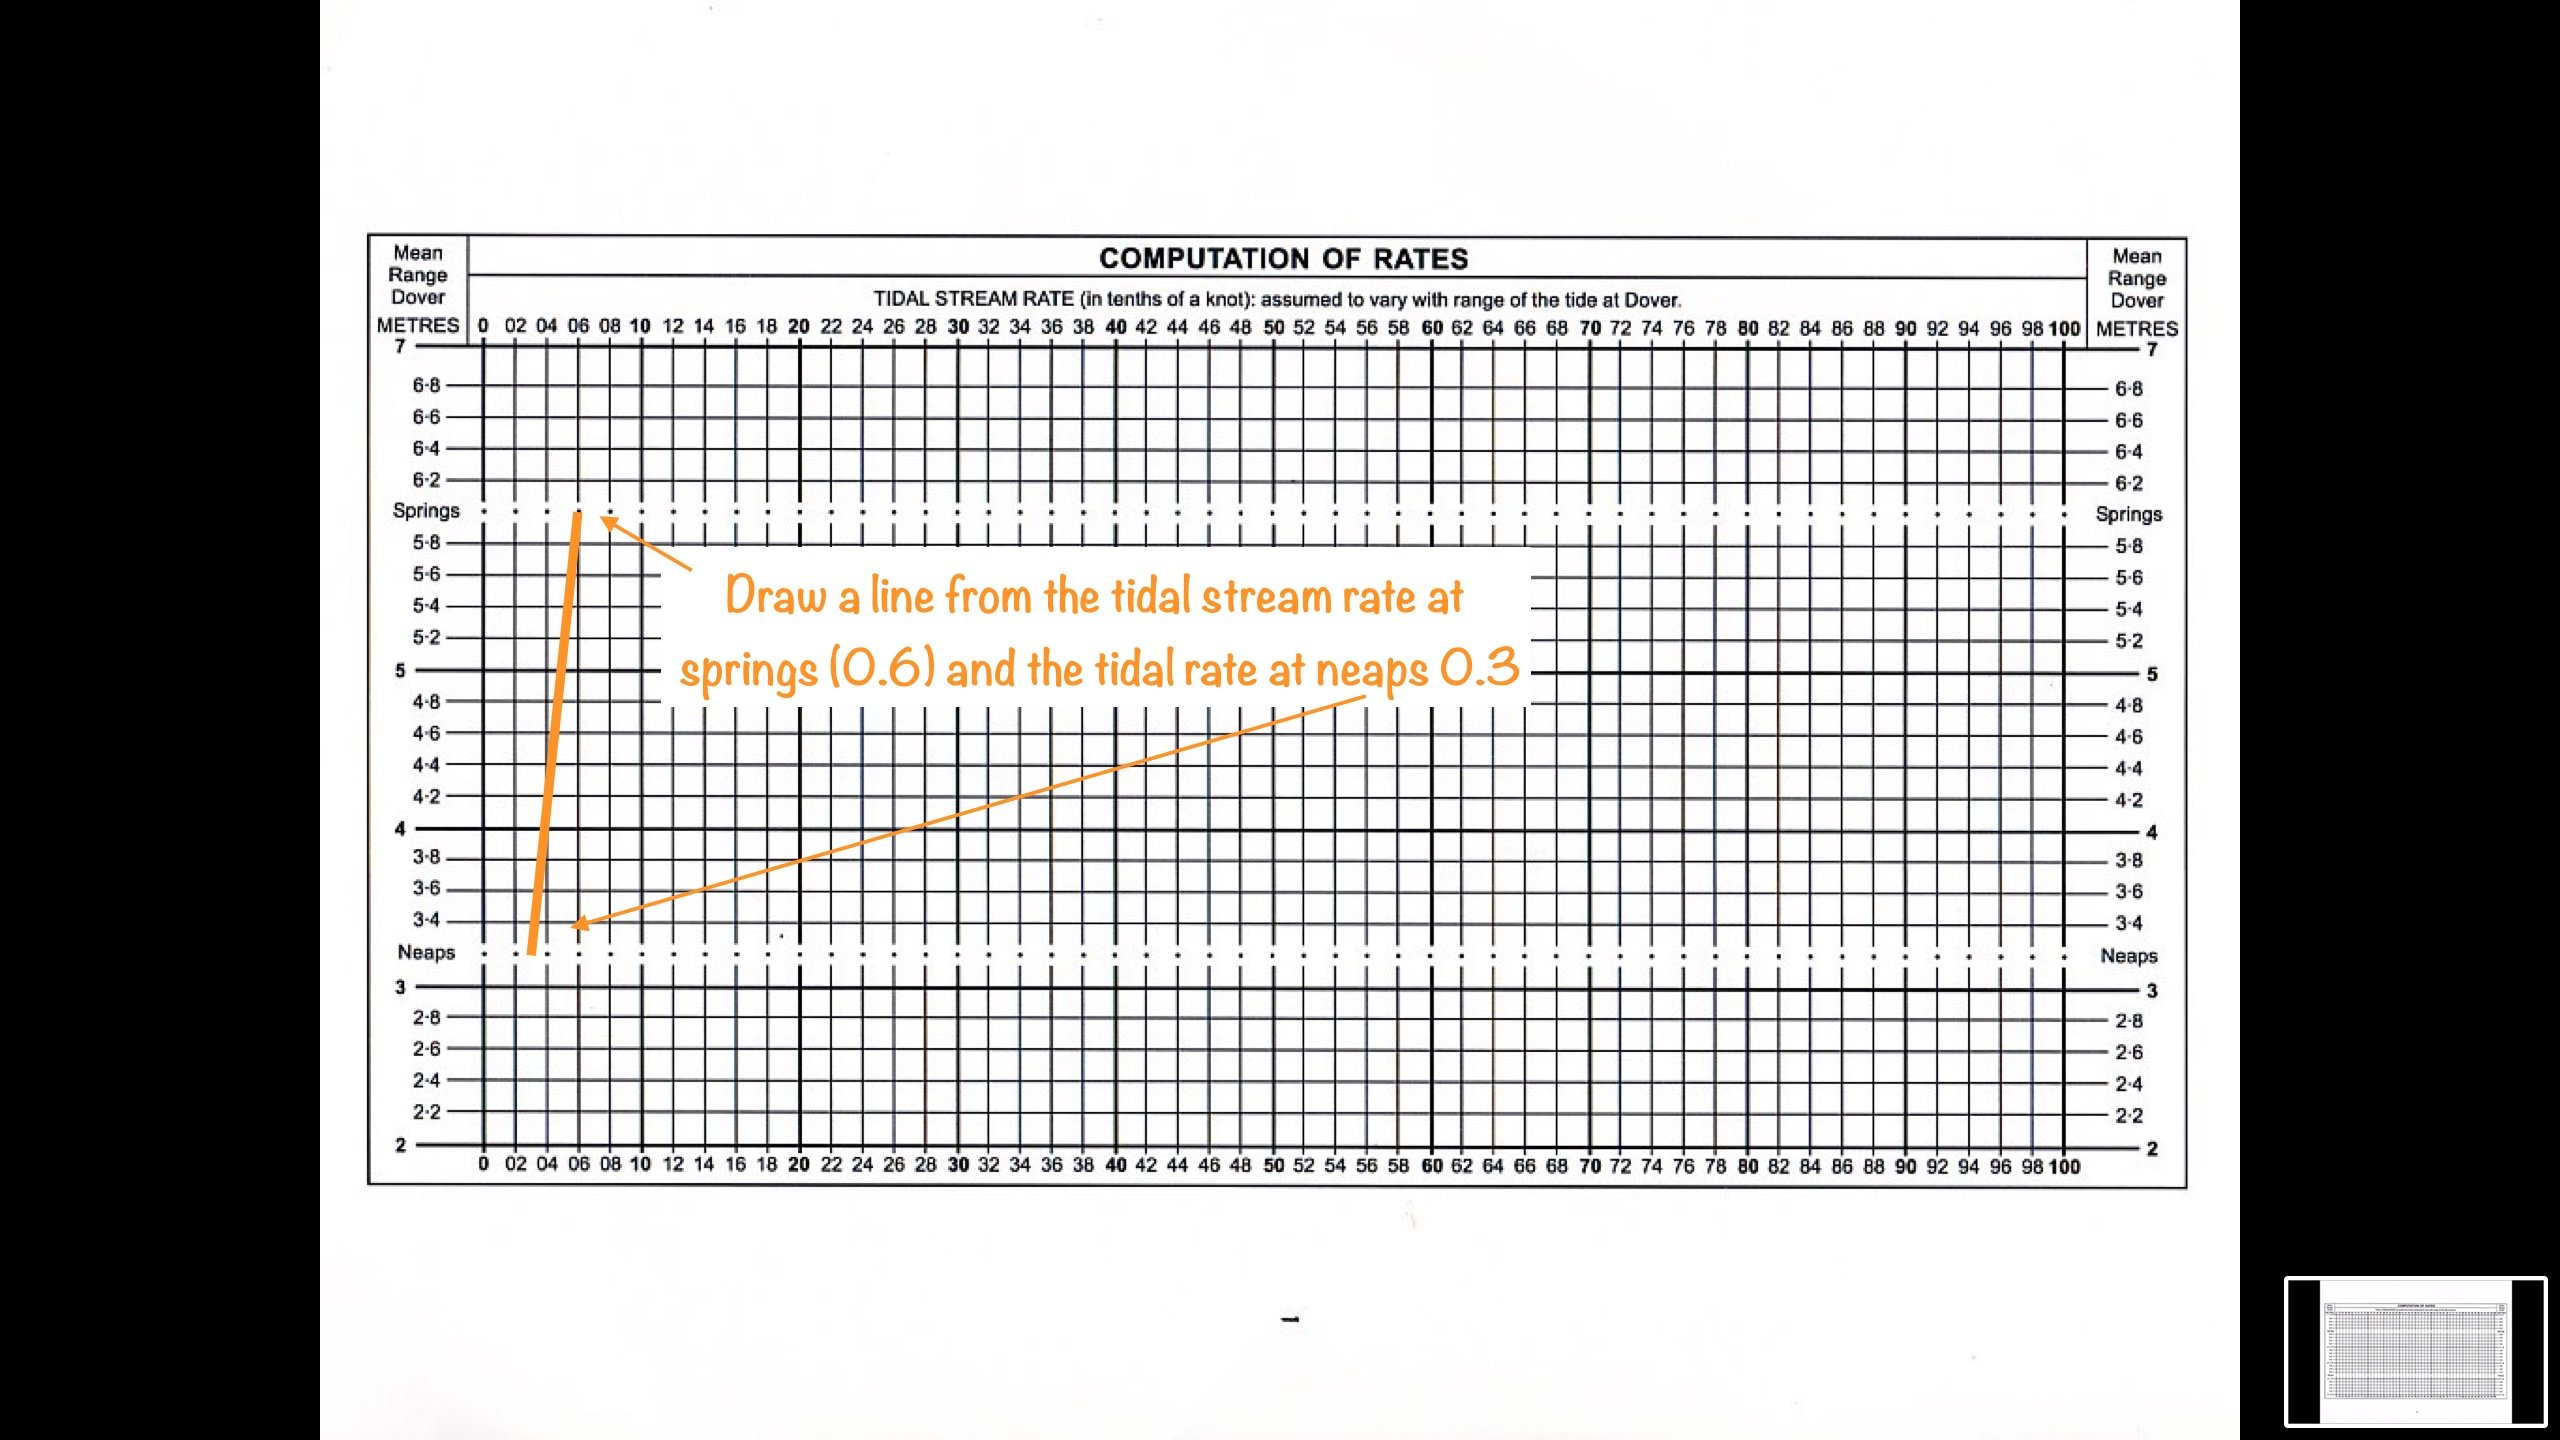
On 28th February 2018 HW is at 0952. Looking at the tidal atlas page for HW, you can see the tidal streams are fairly weak (03,06). "03" is the neap value and "06" is the spring value. This means that at neaps the speed is 0.3Kt and at springs it is 0.6Kt
So far we have found the tidal stream direction that we are interested in and the rate (speed) of tide at springs and Neaps. But as we are neither on Springs or Neaps we now need to calculate a rate to use on the day.
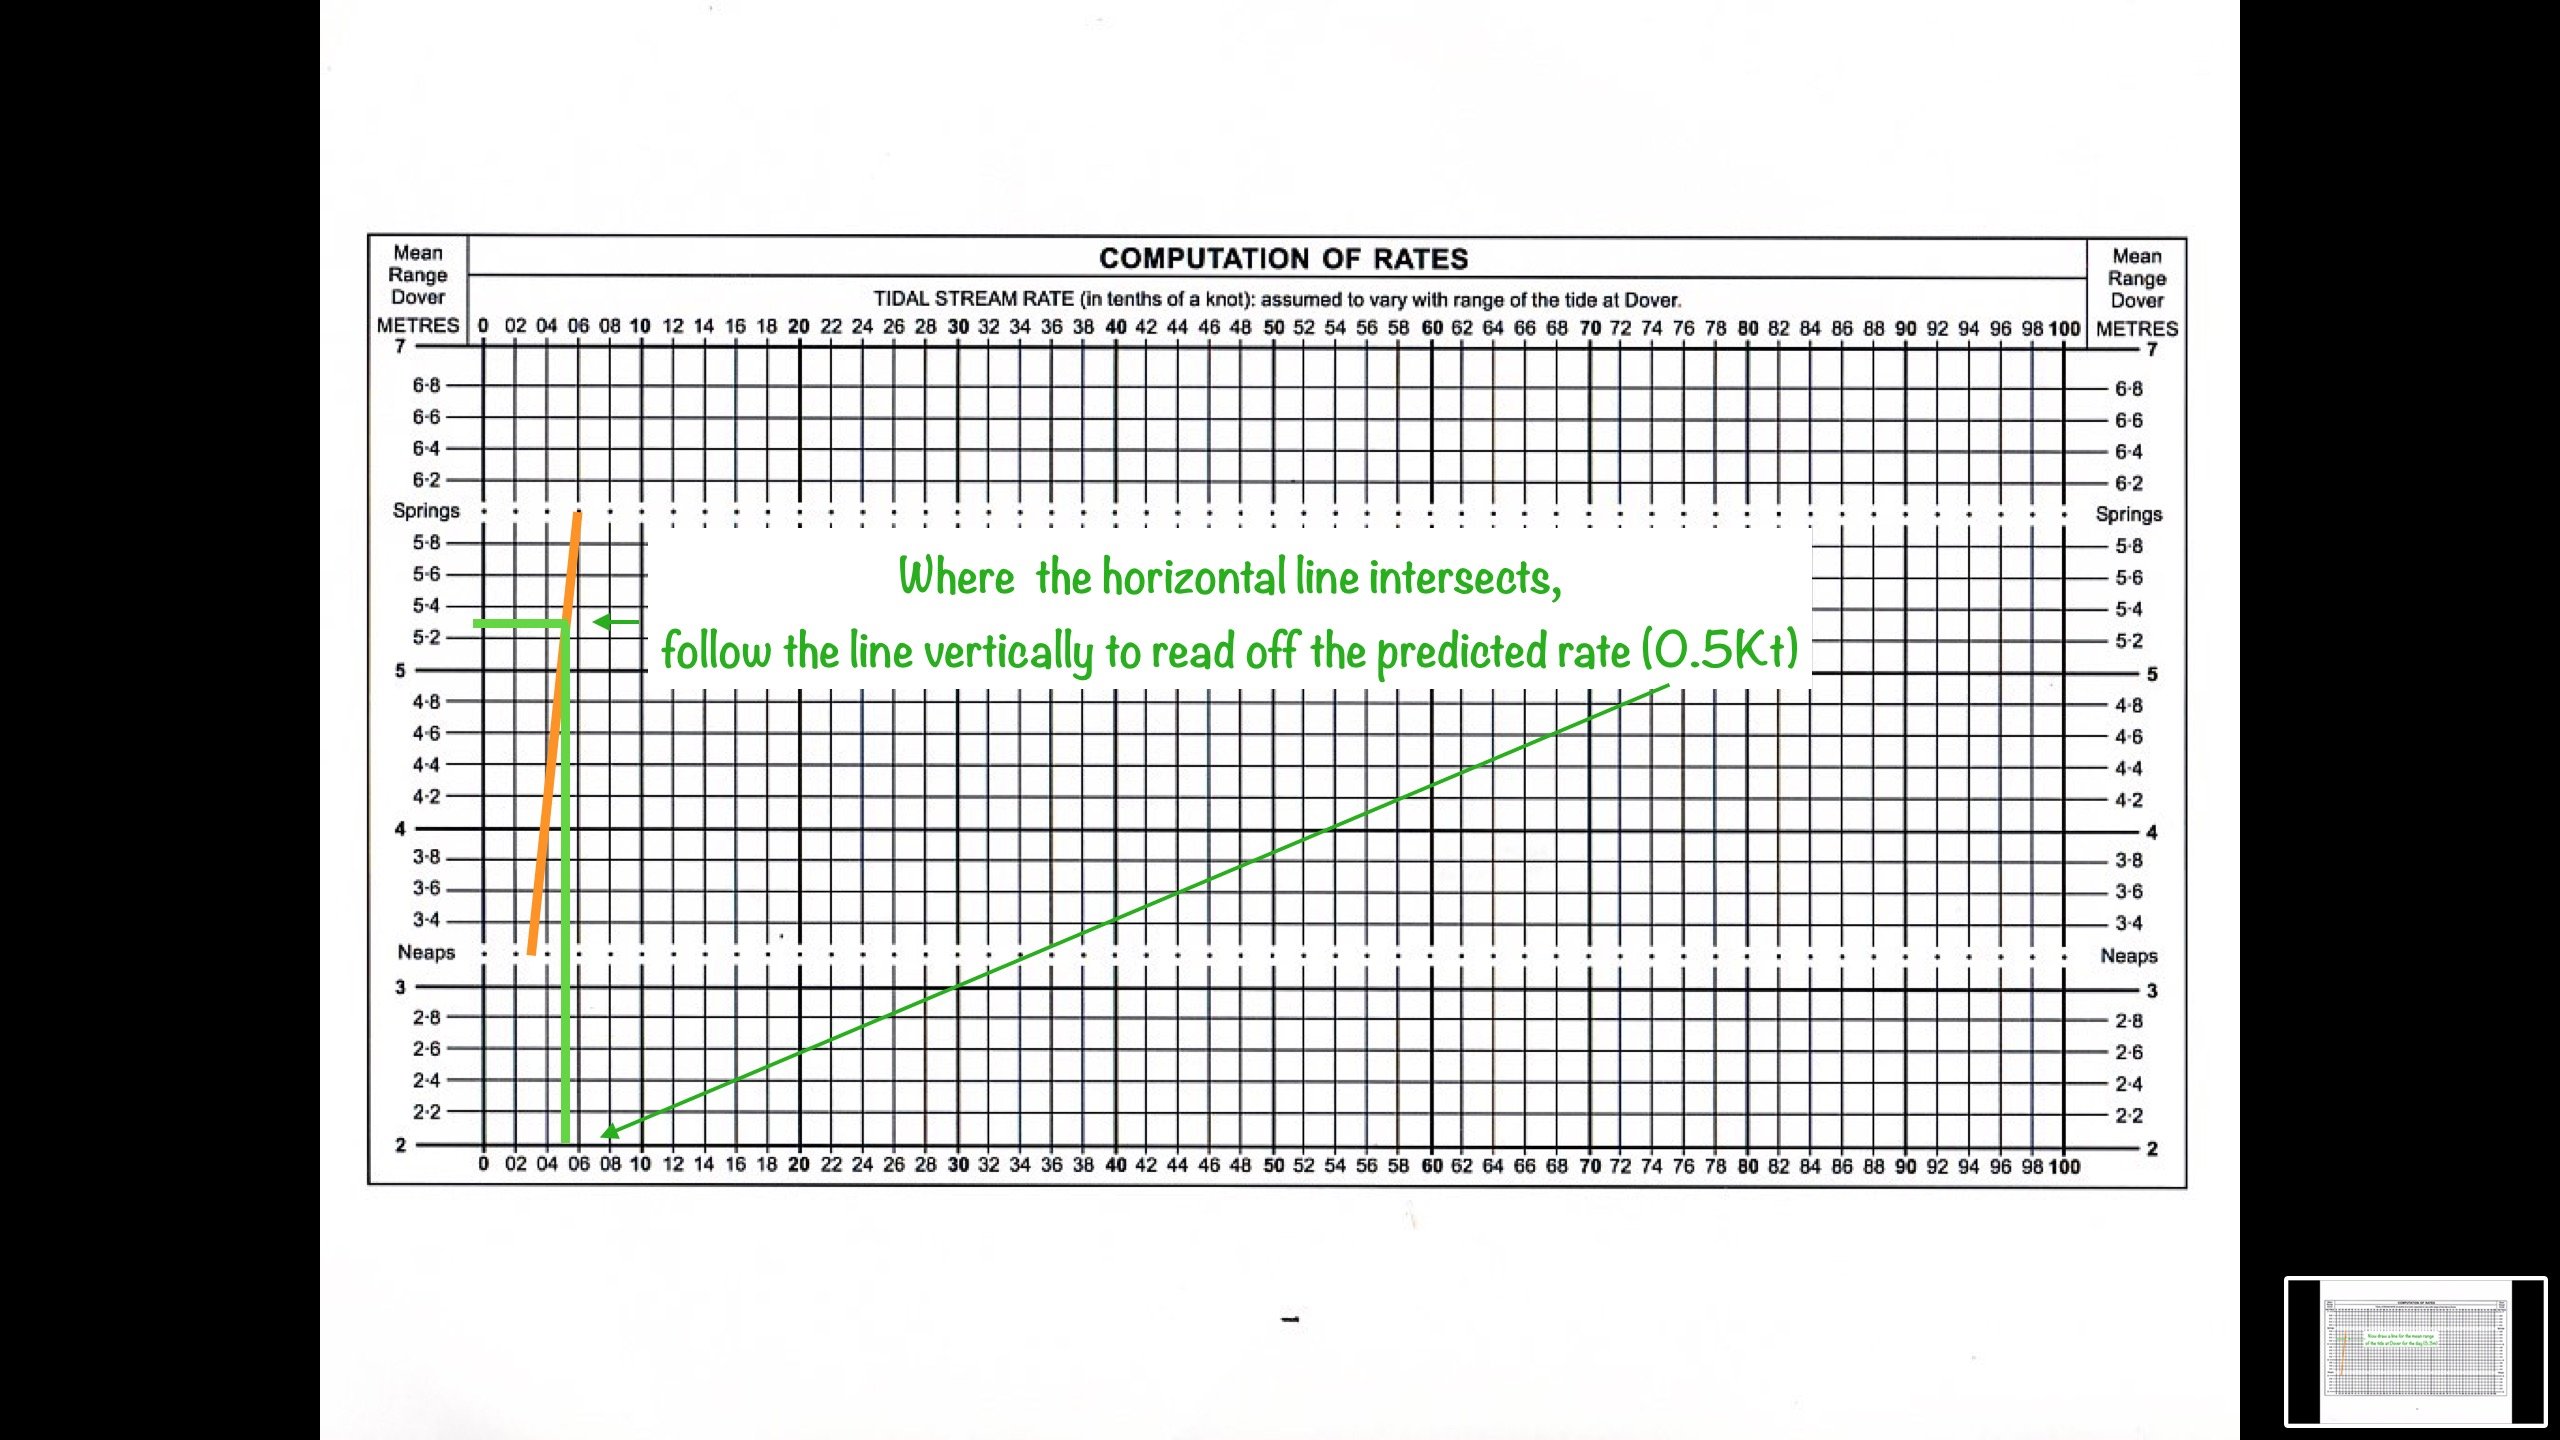
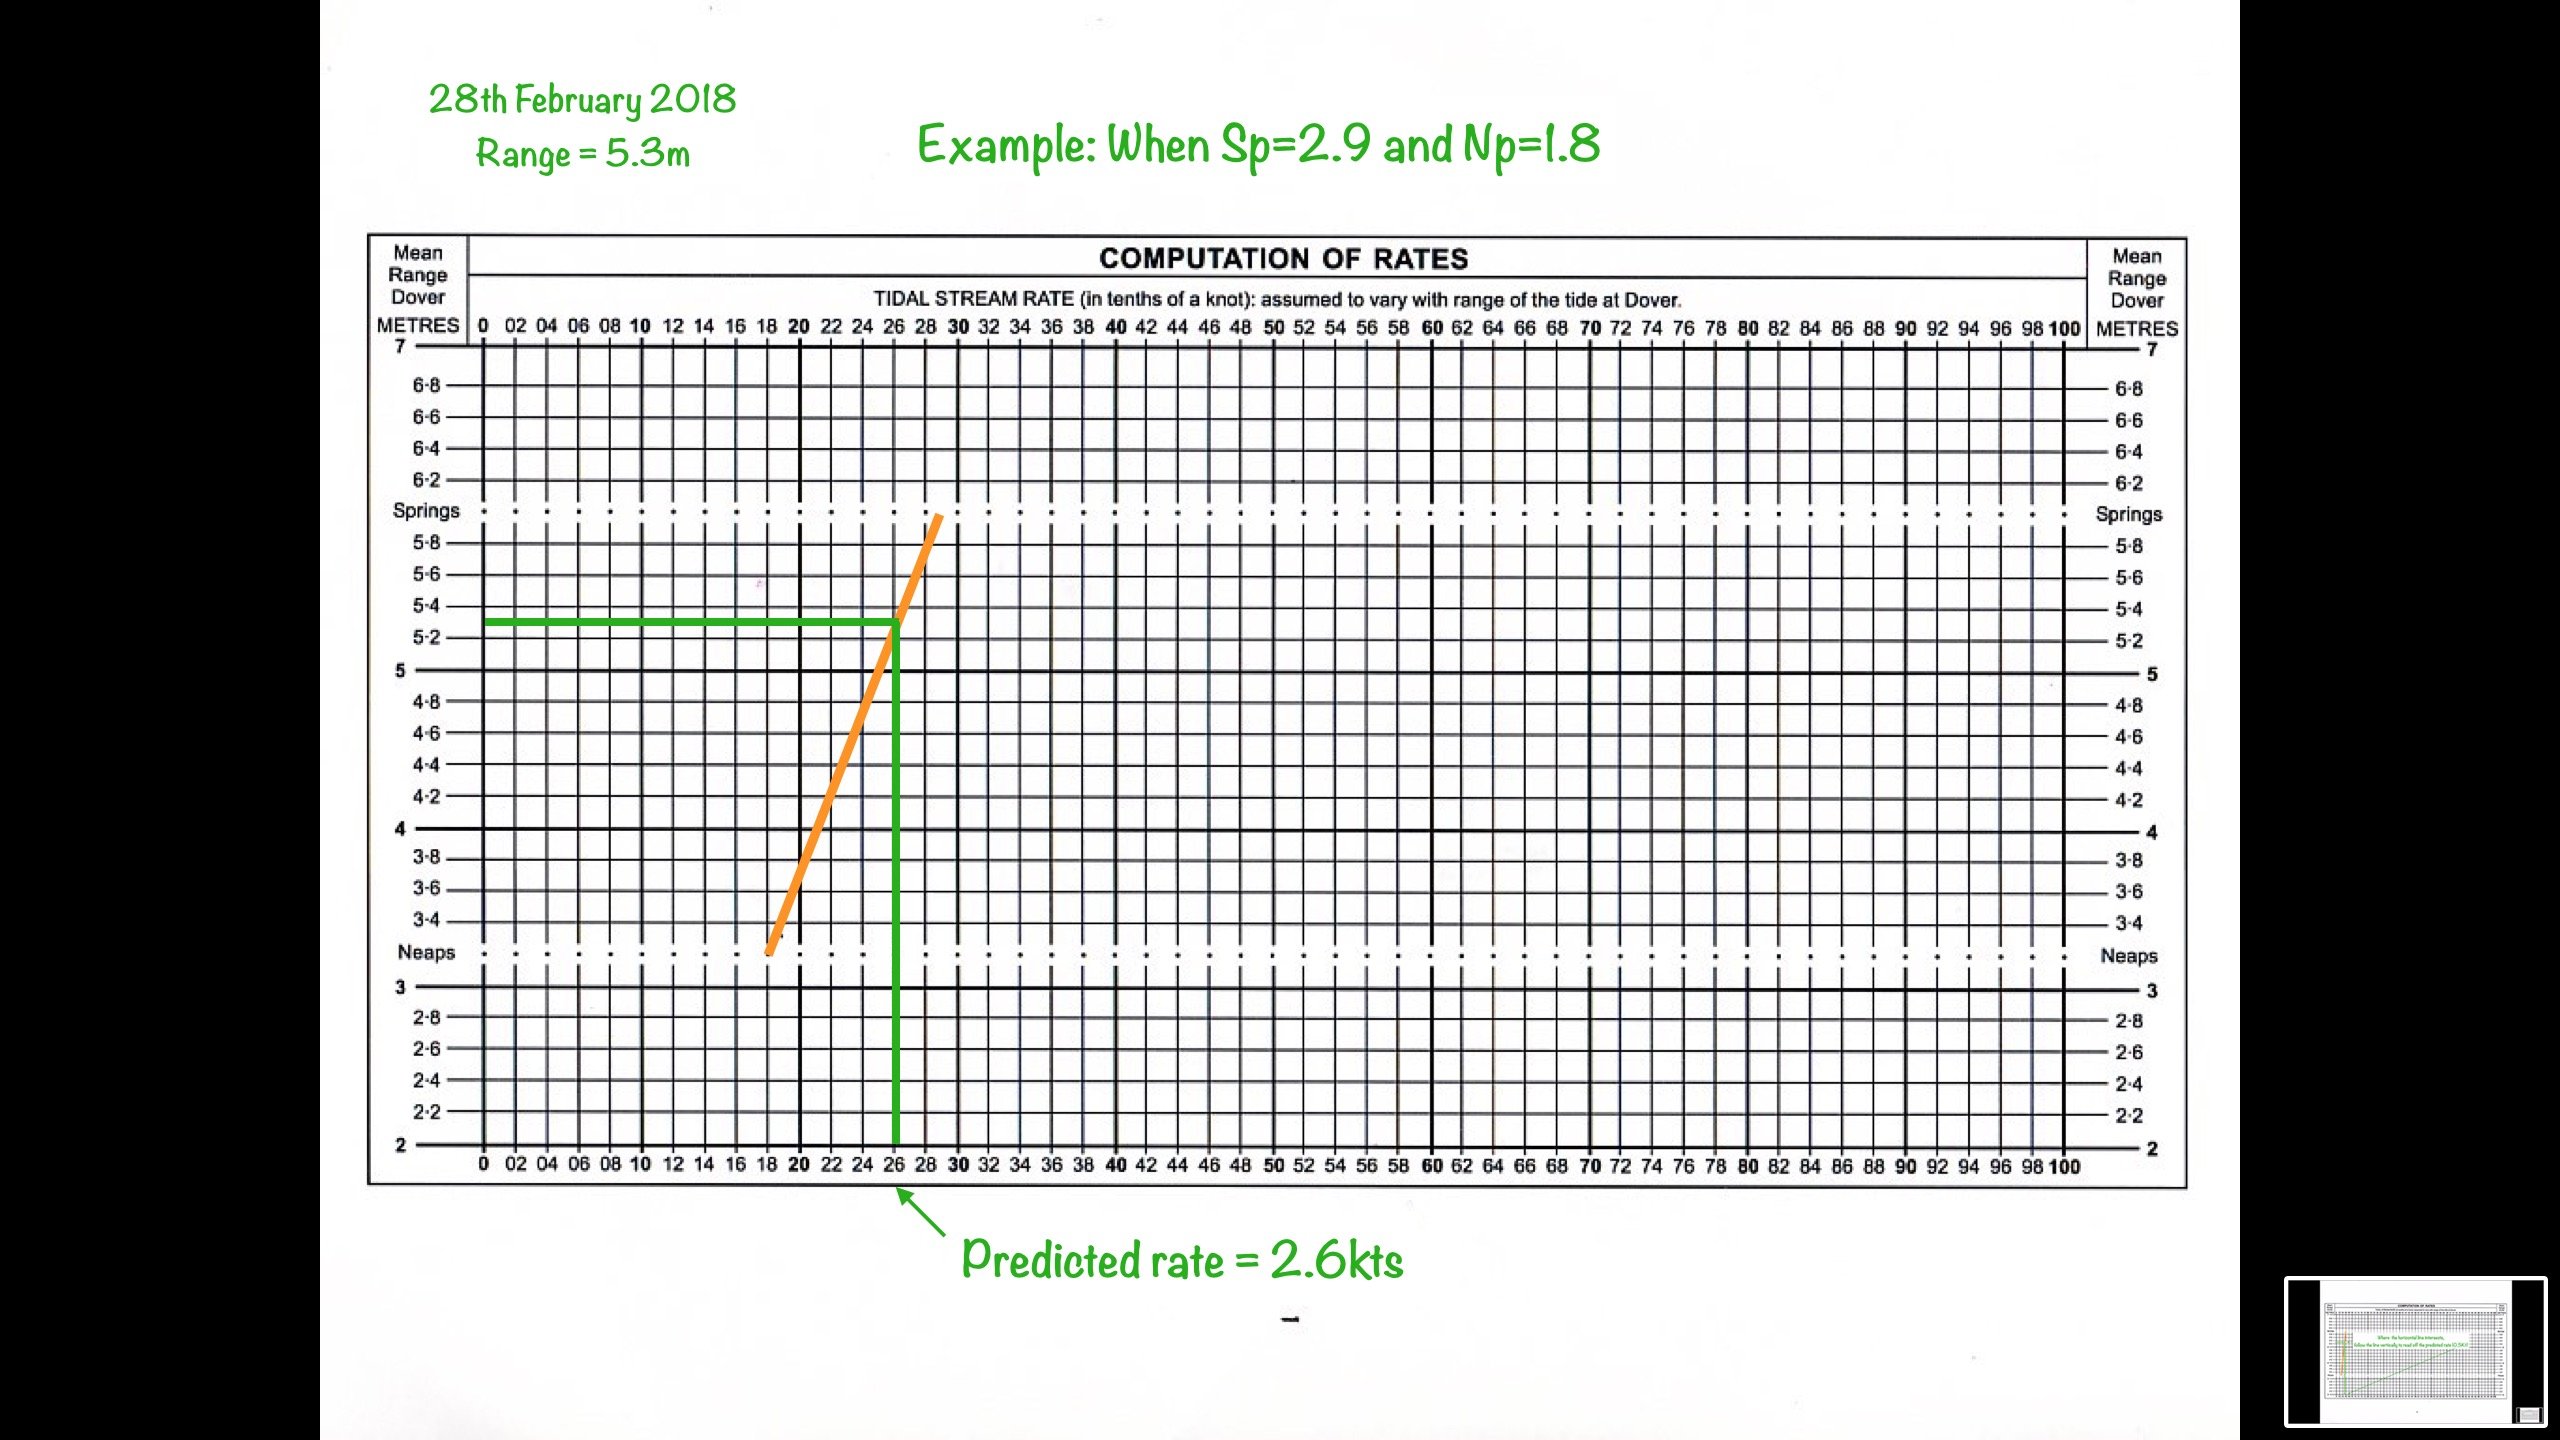
To do this we first need to go to the tide table and find the range of the tide on the day. That is the difference between the high water height of tide (6.4m) and the low water height of tide (1.1) at our standard port (Dover) on 28th February 2018. This gives us a height of 5.3m.
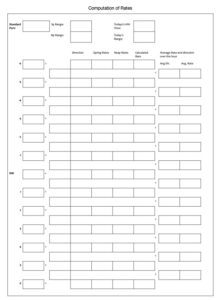
Using the Computation of rates table for Dover, found in the Admiralty Tide Atlas, you can easily work out the tidal stream rate for the day, for each hour of the tide.
For the mathematically minded of us there is a formula for working out the tidal stream rates.
- Range Before or After HW = Ht
- Neap Range = Np
- Spring Range = Sp
- Spring Rate = Spr
- Neap Rate = Npr
Tidal Stream Rate = (Ht-Np) / (Sp-Np) * (Spr-Npr) + Npr
Using the values for the second hour after HW:
Tidal Stream Rate = (5.3-3.2) / 6.0-3.2) * (2.9-1.8) + 1.8
Tidal Stream Rate = 2.625 kts
I can start to fill in my Tidal Hour Sheet with the values we have already established. The Standard port is Dover, the spring range is 6.0m and neaps are 3.2m. Todays HW time is 09:52 and the tidal range is 5.2m.
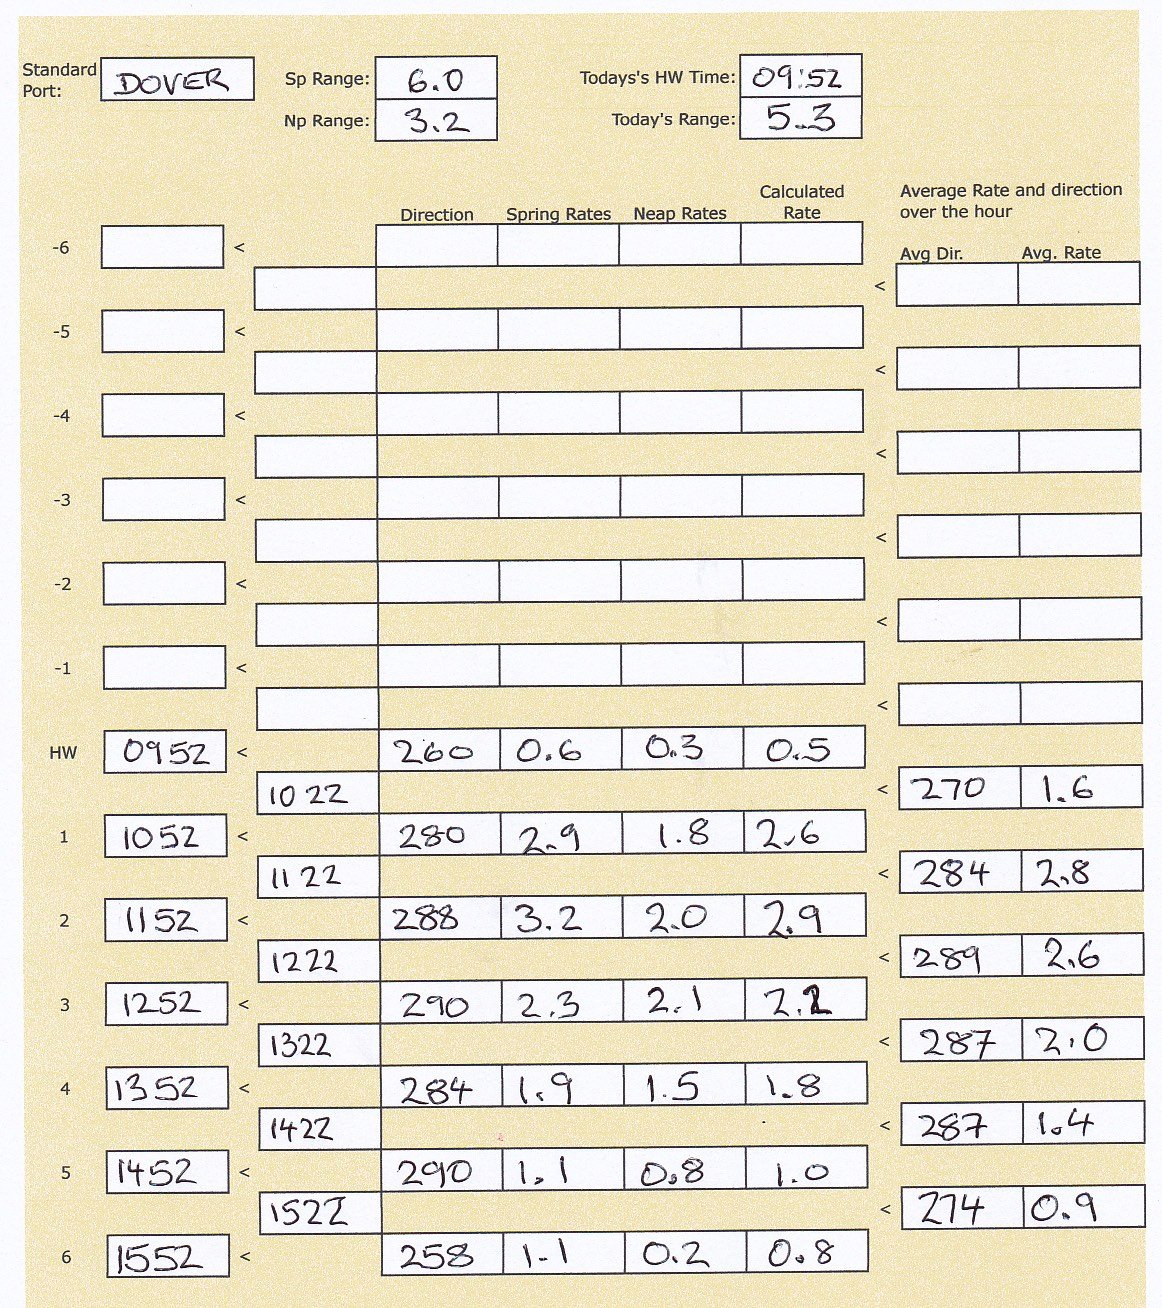 I've not bothererd filling in the values before high water as I don't fancy setting off in the dark. You can see I have filled in the direction, spring rate and neap rate from the tidal chart, along with the calculated rate (using the computation rates for each hour).Note: at some point during the crossing, say for the third and forth hour, my position will be somewhere between the two tidal streams. As such I have estimated the average of the rates given in the tidal streams atlas.
Having worked out the tidal rate and direction on each hour (the tidal atlas gives you the speed and direction at a specific time), I can then determine the average drift rate and direction across the hour. For example, what the average rate and direction is between say 09:52 to 10:52. This is calculated by taking the average of the rates and direction over an hour. See columns "Avg. Dir" and "Avg. Rate".
Of course if you are using the half hourly times, the Direction and Calculated rate is the average between say 10:22 and 11:22!
Having worked out the values on my Tidal Hour Sheet, we can now start plotting on the chart. The first line to be drawn on the chart is the line of intended travel. In this case I am going from the point of Ayre to the Isle of Whithorn. Make sure you draw a line that goes through and beyond your destination.
On the chart below I have plotted two different methods of working out the tidal vector. There are pros and cons to both but the end result should be the same ie. you arrive at your intended destination.
Red Method - "Total tidal drift"
The first method (red) plots the "total tidal drift" all in one go from your start point.
Blue Method - Drift hour by hour
The blue method plots your drift and position for each hour.
Red Method - Total tidal drift
For the red method I have worked out using the values we calculated earlier the total drift or, where we would end up if I sat in my boat at the Point of Ayre and didn't paddle. In the first hour, I would drift 1.5 nm due west (270 degrees). From this point during the second hour I would drift 2.7 nm at 284 degrees. The third hour I would be taken 2.4 nm at 289 degrees and so forth. Each time I move by an hour I can check my position to see if I have reached (or passed) my destination (Isle of Whithorn) by multiplying our speed 3kts by the number of hours, giving the number of nautical miles. Opening my dividers to the number of nautical miles for each particular hour and placing one end on the drift position for that hour, you can see exactly what your position would be at the point where the dividers cross the line of intended travel.
Note: this point is not the destination point (a common mistake) although in my example it is virtually the same thing! It is always the point the dividers cross the intended line of travel, even if this is beyond you destination. If your dividers do give you a point beyond your destination, this will mean that you will arrive at your destination earlier than the full hour.
Blue Method - Drift hour by hour
Using our values we have calculated in our table; in the first hour, you would drift 1.5 nm due west (270 degrees). As we travel at an average paddling speed of 3 kts, we would cover 3 nautical miles in one hour, so opening up our dividers to three nautical miles, placing one point on our drift position after one hour, I can then find the point where the dividers cross our line of intended travel. Drawing a line from our drift position point to where the dividers cross the line, I can then measure the vector bearing required to travel for that hour. I then repeat this for each subsequent hour, using the direction of drift and average drift speed over the hour from our table above. However, using this method on the water does mean you have to check and change your vector bearing every hour. Unless, having calculated all the vectors, you work out the average vector bearing over the total number of hours ie. Total up each bearing and divide by six (in our case).
30+60+50+41+28+20 = 229
229/6 = 38 degrees, the same result as the red total drift method!
The advantage of the Red method over the Blue method, is that you don't have to change course every hour!
In Part II I am going to look at tidal planning using tidal diamonds!
The content of these pages is put together in good faith and is constantly evolving. It is possible that errors exist within this content. If you spot an error or would like to add anything to these pages please contact us via email.
Related Pages
